Background
The first time I wrote a CV, it was in Microsoft word. Getting the relevant information onto the page was not particularly difficult or time consuming. The difficult part was the formatting. Going in and changing all the margins, font sizes and table properties nearly drove me insane.
A few years went by and I got sick of having to spend so long formatting after making any simple change, so I tried converting my CV to LaTeX. I had no experience of LaTex at the time, but after several hours of searching online, I had manage to recreate my old CV, and the only visible difference were the fonts.
Nowadays, whenever I’m writing documents, I’m using Org-Mode in Emacs. I don’t think that there should be any difference for my CV, and now thanks to Org-Mode’s ability to export to LaTex, there doesn’t need to be. I’m quite happy with how it turned out.
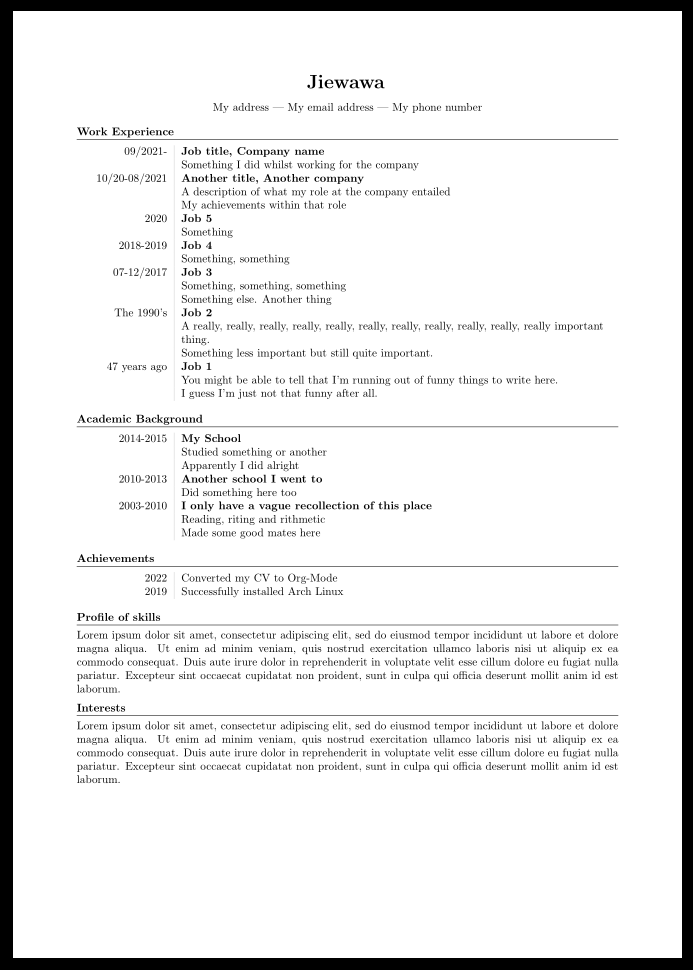
Figure 1: Screenshot of a sample CV made in Org-mode
How you can do the same
My technique makes heavy use of tables. Luckily for us, Org-Mode has excellent support for plain text tables. This was actually the main reason that I decided to make this conversion in the first place. Tables in LaTeX can be very powerful, but I find that Org-Mode’s tables can do everything I need while being much more pleasant to write and manage.
One thing worth noting is that because I wanted cells in the right hand column to be two or three rows tall, I have to add a physical line break as seen below.
#+ATTR_LATEX: :environment tabular :align {L!{\VRule}R}
   |---------------+-------------------------------------------------------|
   | 09/2021-      | *Job title, Company name*                             |
   |               | Something I did whilst working for the company        |
   |---------------+-------------------------------------------------------|
   | 10/20-08/2021 | *Another title, Another company*                      |
   |               | A description of what my role at the company entailed |
   |               | My achievements within that role                      |
   |---------------+-------------------------------------------------------|
The LaTeX
The only packages that need to be installed on top of the standard texlive-core I got from my package manager are titlesec and titling. I installed them with tllocalmgr.
I keep all of the necessary LaTeX in a seperate org file that I call as a setup file, but you could also have them in the header of your main file. Most of this was directly transferred from my old CV.
#+DATE:
#+OPTIONS: toc:nil num:nil
#+LaTeX_CLASS: article
#+LaTeX_CLASS_OPTIONS: [8pt,a4paper]

# Hide page number
#+LaTeX_HEADER: \pagenumbering{gobble}

# Setup packages to be used
#+LaTeX_HEADER: \usepackage{array, xcolor, bibentry}
#+LaTeX_HEADER: \usepackage[margin=2cm]{geometry}
#+LaTeX_HEADER: \usepackage{titlesec}
#+LaTeX_HEADER: \usepackage{titling}

# Table aesthetics
#+LaTeX_HEADER: \definecolor{lightgray}{gray}{0.8}
#+LaTeX_HEADER: \newcolumntype{L}{>{\raggedleft}p{0.14\textwidth}}
#+LaTeX_HEADER: \newcolumntype{R}{p{0.78\textwidth}}
#+LaTeX_HEADER: \newcommand\VRule{\color{lightgray}\vrule width 0.5pt}
#+LaTeX_HEADER: \renewcommand{\hline}{}

# Indentation
#+LaTeX_HEADER: \setlength{\parindent}{0pt}

# Subtitles
#+latex_header: \titleformat{\section}{\bfseries}{}{0em}{}[\titlerule]
#+LaTeX_HEADER: \titlespacing{\section}{0pt}{5pt}{5pt}

# Header
#+LaTeX_HEADER: \renewcommand{\maketitle}{\begin{center}{\LARGE\bfseries \theauthor} \vspace{5pt} \smallbreak \thetitle \end{center}}
I had to make two small additions to get my desired output. These are the two instances of \renewcommand that you can see above.
Because of how I had set up my tables, the exporter wanted to draw a horizontal line between each row. I didn’t have these in my old LaTeX document, and I found that the easiest way to solve this issue was to set \hline to do nothing.
The other change is a bit more of a hack and it involves the displaying of the header at the top of the document. I ended up putting some personal information as the title of the document, and while it is not ideal it is the simplest way of dealing with it. I probably could have done it as a subtitle, but I’m happy enough with how I’ve done it here, even if it is a hack.
# -*- eval: (org-cv-local-variables)  -*-
#+TITLE: My address --- My email address --- My phone number
#+AUTHOR: Jiewawa
#+SETUPFILE: ~/notes/setup/cv_setup.org
Finally, there are a few variables that I wanted to set when loading the file. I hadn’t installed any additional packages ontop of the default texlive-core from my package manager. Disabling the two variables below allow the document to compile without errors.
The other option is more a matter of personal preference. I normally have olivetti-mode enabled in Org-Mode buffers as I like having a narrow and central column for writing, but I decided to disable it for this current file because some of the tables exceed the text body width.
(defun org-cv-local-variables ()
  (setq-local org-latex-with-hyperref nil)
  (setq-local org-latex-default-packages-alist nil)
  (olivetti-mode -1))
Why would you want to do this?
Besides wanting to spend as much time as possible within Org-Mode, generating a CV this way has many practical uses. I feel as though I’m finally at a point where the next time I need to update my CV, I won’t need to completely change the format and can just make the necessary changes in a few minutes and get on with more important things, like configuring Emacs.
✉️ Respond by Email.